
I don’t cook (and am not a foodie either!) However, I do manage a food blog (its technical aspects, SEO, and monetization) that belongs to my sister who is a big-time foodie.
Apart from that, I also get a handful of emails from my readers who love cooking and who wants to get into food blogging. That is, they want to start a food blog and make money. Well, it’s simple but not easy.
You know why? Because anyone can start a food blog and all it takes is around $100 per year and few hours a day (to actually publish recipes). But that doesn’t guarantee a single penny.
Oh yeah, there are a ton of how to start a food blog and make money kind of tutorials on the web but the reality is that you’re hardly going to make any money (at least for the first few months or even years) unless you already know what you need to know about food blogging and digital marketing.
If you have already started a WordPress blog in the past then you have some edge, and if you are also willing to spend some money on marketing and promotion then you are even better placed to start a food blog than another beginner.
Just beware that as a newbie food blogger no one is aware of your blog, no one might read and use your recipes. It will be just another food blog. Well, it’s a start. A beginning. And yes, in time, you can make all the difference.
Don’t Miss: 27 Things Before Starting A WordPress Blog
First things first.
So, What’s A Blog, Anyhow?
A blog is basically an online diary where our blog content (also known as blog posts or simply posts) are sorted chronologically – usually in a reverse chronological order. The act of updating a blog (with fresh content) is known as “blogging”. So how’s a blog different from a website? All blogs are websites but not all websites are blogs. Simple as that.
“Blog” is an abbreviated version of “weblog” that features diary-type commentary and links to articles on other Web sites, usually presented as a list of entries in reverse chronological order. — WordPress
It’s super easy to create a free blog as there are tons of blogging platforms out there like Blogger, WordPress, Tumblr, Medium.com, Squarespace (Premium), etc.
You can start a blog for FREE on any of those platforms so that you’ll get a blog like your-name.blogspot.com OR your-name.wordpress.com OR your-name.tumblr.com. In other words, you can’t get your-name.com for free from any of those platforms (unless you pay for it). Starting a blog on any of those platforms is simple and easy as it’s just like updating status on your Facebook or Twitter – so it takes less than 10 minutes to actually create a free blog.
But I wouldn’t recommend any of the above platforms as in that case you technically don’t own the blog. Don’t believe me? Check out How Google Shuts Down Popular Blogger John Hempton After Publishing Controversial Post.
WordPress is web’s favorite blogging platform. It’s a software that lets you create, manage and publish your content seamlessly. That’s why over 20% of the web or almost 50% of all blogs are powered by WordPress. WordPress has two flavors, namely: WordPress.com (the free hosted version — like example.wordpress.com) and WordPress.org (self-hosted version — like my blog).
WordPress.com is the hosted version of WordPress.org itself and is owned by Automattic (the company who created WordPress). Since it’s managed by Automattic, you don’t have to worry about upgrades, installation, security or maintenance.
WordPress.org is an open-source blogging software. So, anyone can download the WordPress software from WordPress.org and install on their website for FREE. And then you own it and you manage it. It’s limited only by your imagination (and tech chops) as there are thousands of themes, plugins, and widgets available to transform your WordPress site into almost anything that you can imagine.
Don’t Miss: WordPress.com vs. WordPress.org: The Ultimate Comparison With Pros & Cons
When you sign up for a free WordPress.com account your blog address will look like your-username.wordpress.com and if you choose the self-hosted version of WordPress (that is, WordPress.org) then you can start your blog with a branded address like your-name.com.
So my aim is to help you set up a food blog on the world’s most awesome blogging platform – WordPress.org.
And I’m going to assume that:
- You want to start a self-hosted WordPress blog (that is, your own .com blog).
- You do not want to start a free blog on Blogger.com or WordPress.com. Confused? Check out Blogger vs. WordPress and WordPress.com vs. WordPress.org.
- You’re willing to read a lot. I mean, A LOTT.
- You understand that blogging is simple but not easy and it’s NOT for everyone.
- You’ve realized that you can’t ‘start’ a blog in 10 minutes.
- You’ve researched competitors and have already figured out how to stand out.
How To Start A Food Blog: Quick Glance
- Buy A Domain Name & Web Hosting Plan
- Domain name is the .com address that people type in their web browser to visit your blog.
- It costs around $10-15 per year.
- Web Hosting is your storage space on the web (to host your content, images, files, etc.)
- It costs $60-$150 per year.
- Minterest readers, you can buy InMotion Hosting via a special offer and it costs only $107.88 for 3 years (including one-year free domain registration).
- Install WordPress
- It’s a blogging software to manage your content.
- It’s free forever!
- Install A WordPress Theme
- It’s your food blog’s design.
- It’s free if you are opting for a free WordPress theme.
- It costs around $50-$150 (one-time) for a premium WordPress theme.
- Import WordPress Demo Content & Install Necessary WordPress Plugins
- Change WordPress Profile & Settings
- Install & Configure Essential WordPress Plugins
- It’s to change the look and feel of your WordPress blog and to enhance its functionality.
- It’s free forever!
- Customize WordPress
- Setup Essential Blogging Tools
- Yoast WordPress SEO Plugin
- Google Webmaster Tools
- Google Analytics
- Food Blogging Resources
- Recommended Blogging Resources (On Minterest)
- Recommended Food Blogging Resources (Elsewhere)
- Food Blog Promotion
- SEO For Food Blogs
- Food Blogging: What You Need To Know
- Make Money (Food) Blogging
Don’t Miss: How To Start A WordPress Blog (Step by Step Screencasts)
Note: I’m starting a real food blog here for demo purpose and I’m calling it: mKitchenette (mkitchenette.com). You can click on the Step-by-Step tutorial under each heading for full screenshots.
1. Buy A Domain Name & Web Hosting Plan
The first step in building an online business is registering a domain name. It’s like incorporating a company when you want to set up a business. The only problem is, it takes a lot of thinking and patience to find a perfect domain name that reflects your personality, or business, or both.
A domain name is your identity on the web. So try to find a name that’s unique, memorable, short, readable, and brandable (preferably a .com). You will also have to make sure that it doesn’t conflict with other brand names or trademarks.
Recommended Read: How To Choose A Domain Name For Your Blog
Even though you usually get a free domain name when you sign up for a 12-month web hosting plan, I would recommend purchasing a domain name on your own from a domain registrar like Namecheap.com or GoDaddy.com and it costs $10-$15 per year.
Screencast: How To Buy A Domain Name From GoDaddy.com (Step by Step) | YouTube
Doing so will make it easy to manage all your domain names from a single dashboard (assuming that you will need more domain names in the future).
Web Hosting Companies offer a domain name free of cost only for the first year, after which they start charging a premium rate. There’s every chance that you might not stick with the same web hosting company in the future, so it’s always better to purchase your domain names elsewhere and manage them separately.
A website can’t exist without a domain name and a web hosting plan. There are a ton of web hosting companies on the web and then there is countless web hosting comparisons, reviews, coupons, and deals of those hosting companies. And almost all of the bloggers recommend at least one web hosting company of their choice.
The problem is, the web hosting provider recommended by ‘Blogger A’ could be the worst rated hosting company by ‘Blogger B’ or vice versa. Again, a good percentage of the bloggers or the “best web hosting reviews and ratings” are biased.
I would say there’s no such thing as a perfect web hosting company. You need to select a web hosting plan based on your actual requirements and budget. If you want to know more about web hosting and web hosting companies then check out my Web Hosting Handbook. Anyway, I’m recommending a shared hosting plan by InMotion Hosting (oh yeah, Minterest is also hosted by them).
Just in case, Shared Hosting is the most popular — and also the most affordable — web hosting plan. It’s super-easy to manage a shared hosting plan and it’s equally good for beginners as well as experienced webmasters.
Shared hosting basically means that you’re sharing your server (resources as well as the cost) with hundreds of other websites. And that makes it affordable for everyone.
The majority of websites on the web are actually hosted on a shared hosting plan. It can cost as low as $1 per month to as high as $25 per month depending upon the hosting brand and their resources. If you are new to blogging or have an existing WordPress.com or BlogSpot.com blog that’s not getting a lot of traffic, a shared hosting plan is all that you need.
Also, shared hosting is good for a personal website or a small business website (assuming that you don’t expect too much traffic every single day, and all you need is an online presence plus business email).
And hey, a shared hosting may also be suitable when you need to host multiple websites — as long as you don’t expect hundreds of thousands of visits an hour to each website.
So let’s get started!
InMotion Hosting Homepage

Go to InMotion Hosting homepage and click on “Business Hosting” to select a shared web hosting plan.
Shared Business Hosting Plans

InMotion Hosting offers 3 shared hosting plans and I would recommend LAUNCH plan (or their basic plan) for beginners as it’s good for hosting up to 2 websites. If you are planning to start multiple blogs or have existing blogs elsewhere (on WordPress.com or BlogSpot.com) that you might want to import then you may have to opt for the POWER plan as it supports up to 6 websites.
Again, it’s a good idea to pick a 3-year web hosting plan as it offers the best value for money. For instance, when you pay annually, your total cost over 3 years would be around $250 whereas it costs only $106.20 for 3 years (when you pay for 3 years).
Configure Your InMotion Hosting Plan

Review your web hosting plan and term, server location (ignore this if you don’t know what it is), and of course the price and click “CONTINUE”.
Choose Your Domain Name

It’s a food blog so the best name that I could imagine was “mKitchen” (as it mimics Minterest in one way or the other). However, when I tried mkitchen.com it was not available. So I checked the synonyms of the word “Kitchen” and got the word “Kitchenette” which means “a small cooking area”.
You can use the “I already own this domain” option if you have already purchased it (say from Namecheap.com or GoDaddy.com) or own it elsewhere.
Check The Availability Of Your Domain Name

Note: Here I’m registering the domain name via InMotion Hosting itself as I obviously won’t need the domain name after one year (or after publishing this very tutorial).
Enable/Disable Domain Privacy Protection

When you buy a domain name (no matter where), your address, email, phone number, company name, domain registration date, and hosting details will be publicly available on the web so that ANYONE can fetch those details by using a simple WhoIs Lookup.
With Domain Privacy Protection, your personal details will be masked and will be replaced with the contact information of the domain registrar (InMotion Hosting in this case) and it helps to prevent telemarketing/email spam.

I haven’t enabled domain privacy protection for any of my domain names and hence I chose to disable it for mKitchenette.com as well.
InMotion Hosting Account Creation

Enter your email address and click “CONTINUE” to start the account creation process.
Account, Billing, & Payment Information

Enter your name, address, company name (optional), phone number, email address, and payment information and click “REVIEW MY ORDER”.
Review Your Order

Make sure that everything is correct and click the “CHECKOUT” button. You will see the confirmation that your order is being processed, and will receive an email confirmation as well.
Account Activation & Get Started

Get started by setting a password for your web hosting account. InMotion Hosting calls their dashboard “AMP” (or Account Management Panel) and it’s from there that you manage your web hosting account (including contact & billing information, account password, support ticket, bill payments, domain names, etc.).
Step-by-Step: How To — Start A Food Blog — Buy A Domain Name & Web Hosting
2. Install WordPress
Now that you have purchased a domain name and a web hosting plan, it’s time to get to know your web hosting account and setup WordPress on your server. InMotion Hosting calls their account dashboard “AMP” (or Account Management Panel) and it’s from there that you manage various aspects of your web hosting account (including contact & billing information, account password, support ticket, bill payments, domain names, etc.).
Log In To Account Management Panel (AMP)
Log in to AMP (Account Management Panel) by using your primary email address and the password that you have set (as part of the account activation).

Get To Know The AMP
")
It’s your InMotion Hosting dashboard. You can see a handful of options there but its use depends upon your requirements. Anyway, I have highlighted few options that you need to pay attention.
- Contact Information — To make sure that your contact information is up-to-date.
- Submit Support Ticket — To get support (including technical assistance) related to your web hosting account.
- cPanel — To manage your website (note that its purpose is different from that of AMP). You use the AMP to manage your web hosting account and you use cPanel to manage your website (including email accounts, subdomains, web applications, files, etc.).
- Account Technical Details — Shows various technical aspects of your web hosting account and server.
- Email — To manage your custom email accounts ([email protected]).
- Softaculous — To install dozens of web applications on your server at the click of a button.
Softaculous

Softaculous is a script library that lets you install a variety of commercial as well as open-source web applications on your website. Softaculous scripts are installed directly from the control panel of your website (cPanel in this case) and it automatically creates databases, set permission, and configure various files.
You can click the “Softaculous” icon (from the AMP) to install various scripts like WordPress, Joomla, Drupal, phpBB, etc. You want to install WordPress, right? So, you can either click on the “WordPress” icon from “Softaculous” or you can click the “WordPress” icon from cPanel itself (as WordPress is already listed there as a “TOP APPLICATION”).
WordPress Installation

Enter the basic details to set up your WordPress blog.
- If you want to install WordPress on your domain’s root (i.e. example.com or mkitchenette.com), then you need to leave the “In Directory” field blank (as shown above). And if you want to install WordPress on a subfolder named blog (i.e. mkitchenette.com/blog/) then you need to enter “blog” in the directory field.
- Enter the Site Name (or the name of the blog) and Site Description (or the tagline of the blog). Oh yeah, you can change it anytime.
- Enter the Admin Username (or login id), Admin Password (or login password), and Admin Email (to reset the password and for all notifications).
- Enter an email address (can be different from your admin email) for the “Email installation details to” field.
- Click “Install”.
Installed WordPress
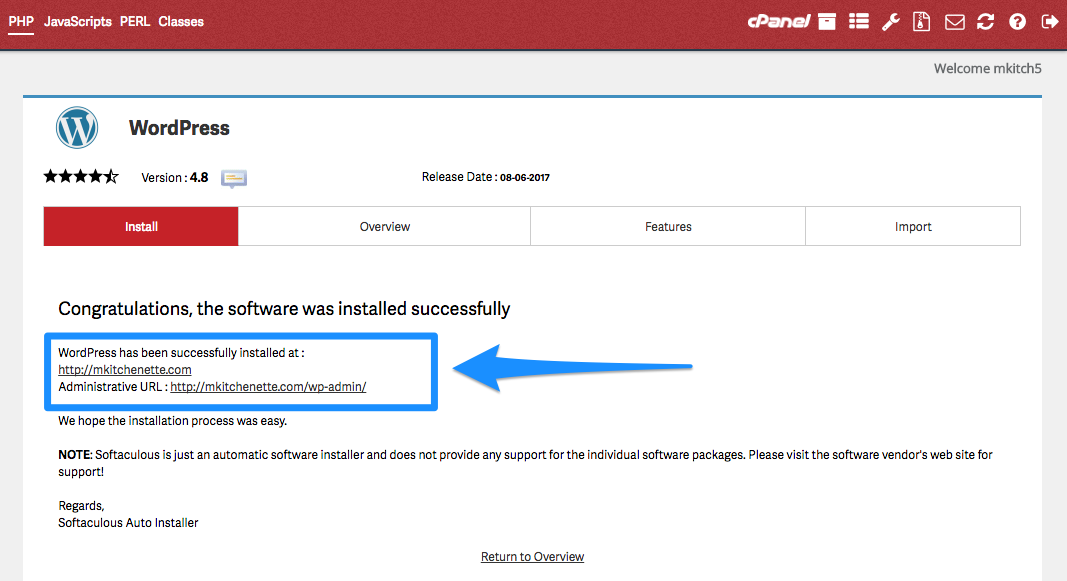
Now that WordPress installation is done on your server. And you can access your WordPress site by clicking on your domain name. You will get the WordPress installation details to your admin email id (provided during installation step).
Step-by-Step: How To — Start A Food Blog — Install WordPress
3. Install A WordPress Theme
When you browse a WordPress theme, you need to visualize your future website. That’s why picking a theme/template is the toughest part of setting up any WordPress site. Seriously. There are a large number of free and paid WordPress themes out there so selecting one from so many themes can be extremely difficult.
The problem with free WordPress themes is that its developers may not update their themes regularly. And when the codes of your themes are not up-to-date, it becomes vulnerable to attacks in the future.
The same applies when you buy a paid WordPress theme from an independent theme developer (or freelancer). You may get the theme you really like at first, but eventually, the theme will become outdated.
I personally recommend buying WordPress themes from a premium WordPress theme marketplace because they make sure that their WordPress themes are up-to-date. And that’s why they release new updates regularly and even add additional features when WordPress updates its core software.
Out of the premium WordPress theme marketplaces, my personal favorite is StudioPress.com (oh yeah, I am also using one of their themes).
There’s every chance that you will come across few terms like WordPress Framework, Child Theme (also known as Skin), and WordPress Hooks to name a few. So let us just explore those terms before getting started.
WordPress, Themes, Framework, Child Theme
WordPress is like the engine of your car, WordPress Framework is like the frame and body of your car, and a Child Theme is like the paint job done on your car.
A decade back there was no such thing called WordPress Framework or Child Theme because then it was all about WordPress plus a Theme. That is, we install WordPress on our web server and install a theme of your choice. That’s it.
In the past few years, WordPress has evolved and became more popular with a developer base like never before. So, it led to the rise of WordPress Frameworks.
That is, WordPress theme developers started building a foundation (known as a framework) for their themes. And it means all the themes developed by a single developer has the same core features (in terms of design, security, SEO. etc.).
It also enables developers to easily create a child theme (or a skin) for a specific framework without having to code from scratch.
WordPress Hooks lets you change the default functions or add your own functions without changing the core WordPress files. You can go here to learn more about it (if you’re not a coder then I hope it won’t make you sick).
StudioPress themes are powered by Genesis Framework and it’s an industry standard WordPress framework trusted by hundreds of professional bloggers.
So here are the reasons I love StudioPress + Genesis Framework + Genesis Child Themes:
- Genesis themes are fast, mobile-friendly, and search friendly.
- Genesis Framework follows best coding practices and it basically means that you don’t have to worry about its code quality.
- There are no renewal costs for Genesis Framework (or for its child themes).
- When you buy a Genesis child theme from StudioPress, you can use it on unlimited websites, and you get lifetime updates and support. Most premium WordPress theme marketplaces charge you on an annual basis and they even charge you an additional fee for the developer version.
- There’s no developer version for StudioPress themes and you can install their themes on any number of websites (once you purchase it).
- The Genesis Framework is updated regularly and you can upgrade your WordPress site with just one-click (from the WordPress Dashboard).
- Genesis offers hooks and filters so you can add your own codes without touching the PHP files of the original theme.
- StudioPress offers a Pro Plus All-Theme Package and it gives you unlimited access to all of their (current as well as future) WordPress themes, plus support and updates.
- Genesis Framework is compatible with most WordPress plugins.
- Genesis developers are everywhere.
- Genesis Framework is so popular that its tutorials are also easily available.
That said, there is no need to go for a StudioPress theme or another premium WordPress theme unless you have a budget and you’re not in a hurry to build a professional blog. You can always build that perfect blog step by step. Almost all the bloggers were once a beginner and chances are they started with a free WordPress theme (myself included).
There are hundreds of thousands of free WordPress themes in the official WordPress theme repository and it’s more than just enough to get started. You can always upgrade later!
I’m installing Foodie Pro by StudioPress (for this tutorial) as it’s already optimized for a food blog. Feel free to browse the StudioPress theme marketplace to find something else or try 25 Hand-picked Genesis Child Theme Marketplaces (to find a Genesis child theme from a third-party WordPress theme marketplace).
If you are looking for something else or let’s say you want to try a variety of themes then I would suggest you try different free WordPress themes or purchase Elegant Themes so that you can download 80+ premium themes for just $89/year. They also have a lifetime access package that costs a one-time $249.
On the flipside, if you like StudioPress then you can consider purchasing Pro Plus All-Theme Package when you’re good to go with it. It costs a one-time $499.95 but you can get it for $350 (or 30% off) or less when they run promotions (it happens every few months and I purchased it for only $260.25).
Add New WordPress Theme

Step-by-Step: How To — Start A Food Blog — Install A WordPress Theme
4. Import WordPress Demo Content And Install & Configure Necessary WordPress Plugins
I’m pretty sure that you buy a WordPress theme only because you loved its demo site. In other words, when you buy a WordPress theme you expect your website to look like its demo site, right?
Well, it’s not that easy. When you install a WordPress theme for the first time, it looks ugly because it doesn’t have any content or images or menus or anything else.
For instance, here is a preview of my food blog — mKitchenette (that I have created to write this tutorial) — before importing the demo content.

Import all the demo content (provided by the theme developer) and install all the necessary plugins (specific to the theme).
Recommended Screencast: How To Install A WordPress Plugin (Step by Step) | YouTube
Install Necessary WordPress Plugins
The following are the necessary WordPress plugins recommended by the theme developer in order to replicate the demo site.
- Widget Importer & Exporter
- Genesis eNews Extended
- Genesis Simple Edits
- Genesis Simple Share
- Simple Social Icons
- WP Featherlight
- WP Instagram Widget
Step-by-Step: How To — Start A Food Blog — Import WordPress Demo Content And Install & Configure Necessary WordPress Plugins
5. Change WordPress Profile & Settings
Now let’s get to know the various settings and configuration of WordPress. The good thing is, most of them are set and forget kind of settings.
Step-by-Step: How To — Start A Food Blog — Change WordPress Profile & Settings
6. Install & Configure Essential WordPress Plugins
Plugins extend the functionality of your WordPress site (just like we add new features and functions to a web browser like Google Chrome or Mozilla Firefox) with custom features. WordPress Plugins are independently developed by third-party developers across the world.
There are over 50,000 plugins in the official WordPress Plugin Directory and you can install any of them using the plugin browser or the installer available in your WordPress dashboard.
If you know what you want then you can use the Search to find it. Or, you can browse the Featured, Popular, Recommended, or Favorites (favorite plugins of a particular WordPress.org user) to get an idea of what’s possible.
As mentioned, there are over 50,000 WordPress plugins available and I have hand-picked only 6 of them. There are actually a lot more plugins that are essential or super-useful but I guess the above list is good enough to start with.
Install Essential WordPress Plugins
Step-by-Step: How To — Start A Food Blog — Install & Configure Essential WordPress Plugins
Install Recommended WordPress Plugins
- Akismet
- BackWPup
- Disqus Comment System
- EasyRecipe
- Editorial Calendar
- jQuery Pin It Button for Images
- Print, PDF, Email by PrintFriendly
- Simple URLs
- W3 Total Cache
- Wordfence Security
- WP Author, Date and Meta Remover
Install Premium WordPress Plugins (Optional)
Don’t Miss: The 101 Best WordPress Plugins — For Anything & Everything
7. Customize WordPress
So you have already imported the demo content (provided by the theme developer) & installed all the necessary plugins (recommended by the theme developer), personalized WordPress settings, and installed and configured all the essential WordPress plugins. The next step is to customize WordPress and the goal here is to create a WordPress site exactly as it is on the demo site.
mKitchenette: Before Customization

mKitchenette : After Customization

Step-by-Step: How To — Start A Food Blog — Customize WordPress
8. Setup Essential Blogging Tools
Now that you have configured your food blog with all the essential WordPress plugins and have customized it. But there’s one last thing. You need blogging tools.
There are hundreds of blogging tools on the web but you don’t have to try all of them. I’m focusing only on 3 tools: Yoast SEO Plugin, Google Webmaster Tools, and Google Analytics. Everything else is optional and subjective as it entirely depends on your blogging/personal preferences.
- Yoast WordPress SEO Plugin
- Google Webmaster Tools
- Google Analytics
Step-by-Step: How To — Start A Food Blog — Setup Essential Blogging Tools
How To Start A Food Blog — Steps 1-9 — The Long Version
- How To — Start A Food Blog — Buy A Domain Name & Web Hosting
- How To — Start A Food Blog — Install WordPress
- How To — Start A Food Blog — Install A WordPress Theme
- How To — Start A Food Blog — Import WordPress Demo Content And Install & Configure Necessary WordPress Plugins
- How To — Start A Food Blog — Change WordPress Profile & Settings
- How To — Start A Food Blog — Install & Configure Essential WordPress Plugins
- How To — Start A Food Blog — Customize WordPress
- How To — Start A Food Blog — Setup Essential Blogging Tools
9. Food Blogging Resources
9.1. Recommended Blogging Resources (On Minterest)
WordPress
- 12 WordPress Settings & Features That You Should Know [Level 1.0]
- 9 WordPress Settings & Features That You Should Know [Level 2.0]
- 10 WordPress Settings & Features That You Should Know [Level 3.0]
- WordPress Customization: 101 Things To Do After Installing WordPress [DIY]
Tips
- 30 Things I Absolutely Hate About Your Blog
- 30 Things I Absolutely Love About Your Blog
- Why 365 Blog Posts Is All You Need To Become A Successful Blogger
Traffic
- Over 71 Ways To Repurpose Your Content Over And Over Again
- Over 61 Paid Traffic Sources To Buy (Real) Targeted Website Traffic
- Over 101 Web 2.0 Sites To Get Instant Backlinks To Your Blog
- Top 30 Social Media (And Web 2.0) Sites To Drive Traffic To Your Blog
Tools
- Over 101 Blogging Resources (Tools & Apps) To Streamline Your Workflow
- Over 501 Blogging Tools (Free & Premium) You’ll Ever Need
- The 26 Best Google Chrome Extensions That Make My (And Probably Your) Internet Life Easier
9.2. Recommended Food Blogging Resources (Elsewhere)
- How To Write A Recipe Like A Professional
- 10 Food Blog Posts That’ll Get You Traffic
- 15 Awesome Food Photography Tips
- 6 Food Photography Tips For Any Camera
- 13 Tips For Beautiful & Tempting iPhone Food Photography
- Food Photography: Mobile Editing & Shooting Tips
- The Serious Eats Guide To Food Photography
9.3. Food Blog Promotion
Submit your recipes to:
9.4. SEO For Food Blogs
I have bookmarked this slideshow way back in 2012. SEO has changed ever since then but I believe it’s still relevant and useful.
- Google Search Engine Optimization Starter Guide
- Google Webmaster & SEO Guidelines
- How I Increased My Organic Traffic By 500% In 10 Months (And Doubled Them In A Year)
- 17 Unexpected SEO Lessons I Learned After Publishing My First Listicle
10. Food Blogging: What You Need To Know
“The holy trinity of food blogging is gorgeous food photography, wonderful writing, and rock solid recipes.” — Irvin Lin
- Food blogging is expensive. I mean, it involves real costs apart from your time. For instance, I do not (but I might in future) spend a single penny on promotion or marketing or content creation (except occasionally). So all it takes is my time to craft a new blog post. On the flipside, when it comes to food blogging, you need to buy real kitchenware and groceries to actually cook those recipes.
- Food blogging is time-consuming too. And no, I didn’t mean the countless hours that you actually take to cook food.
- You will have to spend a lot of time on social media (Facebook, Pinterest, Instagram, StumbleUpon, Twitter, Google+, YouTube, etc.) and other websites as part of the blog promotion.
- Think about a blogging schedule. Daily? Weekly? Monthly? Fortnight?
- Remember, it’s much, much, much better to write one quality recipe than 10 mediocre recipes.
- No one is going to read your blog when you get started.
- Food blogging is super-competitive. If your food blog is not unique enough then your blog presence doesn’t matter. But the good thing is that we’re all different in one way or the other and there’s something interesting in every single individual. So leverage it and put your dent in the blogosphere.
- You’ve to build your personal brand (start with your blog’s About page and social media presence).
- Don’t just limit your topics to recipes, if you are a health freak then offer diet and fitness tips as well. That way, you can attract a wider range of targeted audience.
- Follow other (successful) food bloggers as well and see what they are doing and think about how to stand out from them.
- Always give credits (as Thanks, Inspired by, Credits, Adapted from, etc.) when you publish a recipe from another blog or when you adapt a recipe from another food blog. And always get the permission to use images from another website (or you will be in trouble).
- Blogging involves a lot of technical aspects and you will have to figure out how you are going to manage it (a lot of WordPress plugins that I have recommended here are actually complex).
- You need some photography skills plus the required gadgets and accessories (camera lens, tripod, etc.) and whatever it takes to click amazing photos.
- Remember, awesome photos are what makes a simple recipe looks amazing on the web (even if it doesn’t taste delicious).
- It’s absolutely okay to use your mobile camera (or whatever camera) as long as you are improving. When you can, buy the best affordable camera.
- Nobody has ever started a perfect food blog. It’s all about whether you are doing a better job than yesterday.
- You will need a great design for your food blog (even if you are using a free WordPress theme at first).
- Improve the navigation and user experience of your blog with a great design and also by minimizing the number of ad units and unwanted features. Because it can significantly increase the number of pages visited by a user (or page views).
- Use WordPress tags and categories wisely so that your recipes will appear more organized.
- Interlink your recipes so that it will increase the number of pageviews and eventually your organic traffic as well.
- Ignore Search Engine Optimization (SEO) at first and learn as you go. But do learn how to use Yoast SEO plugin.
- A blog is not a get-rich-quick kind of thing.
- Do not expect any revenue at least for the first 6 months. And never give up (at least as long as you are doing a better job than yesterday).
- Be yourself when you write, blog, and talk. Because everyone else is already taken. When you are writing you can easily come up with original content because you will be writing your own experiences and not someone else’s. And it will be something that your readers can’t find in a book or another blog and that’s what it matters.
- If you have been thinking about starting a food blog then today is the best day.
11. Make Money (Food) Blogging
Start a new food blog. Publish recipes. Publish even more recipes. Monetize it with ads. Make money. Make even more money. Sounds simple, right? Well, it doesn’t work that way. You can’t make money out of ads from a new blog unless you’re getting hundreds of thousands of visits a day.
Of course, you can see a lot of websites making thousands of dollars a month only from ads. But do remember that they’re getting millions of pageviews a year. So forget money, there are enough other reasons why you should blog.
Even otherwise, I would say don’t try to make money blogging from the very beginning. Don’t even think about it. Just focus on writing and promotion. Why? Because if you have great content and is getting decent traffic then there will be a way to monetize it and you can do that any day. Write today; monetize tomorrow!
Anyway, there’s no sure-fire way to monetize a blog. But you do have a lot of options: ad networks, private ads, e-books, affiliate marketing, partner with brands, training, courses, video reviews, etc.
Don’t Miss: What Does It Take To Generate 1,000,000 Pageviews & $3,000 Per Month
Look what other successful food bloggers are doing. And think about what you can do in the already crowded food blogging space. You don’t have to copy other bloggers in your space. Instead, be yourself and learn from others.
Just remember that their success is the result of countless hours of reading, writing, experimenting, researching, clicking, and whatnot. So again, think about how you are going to stand out from the crowd (because that’s going to be your value addition).
For instance, you can Google search “how to start a food blog” and you will see hundreds of other tutorials. So why me? Well, I just added more value by adding my own blogging experience. My version may perform better than others or it may not. But I did my best and that’s what it matters.
Recommended Reads:
“Nothing in this world can take the place of persistence. Talent will not: nothing is more common than unsuccessful men with talent. Genius will not; unrewarded genius is almost a proverb. Education will not: the world is full of educated derelicts. Persistence and determination alone are omnipotent.” — Calvin Coolidge
Happy (Food) Blogging! 🙂
[kkstarratings]