
Now let’s get to know the various settings and configuration of WordPress. The good thing is, most of them are set and forget kind of settings.
1. WordPress Users

“Users” lists all the existing users of your WordPress site. WordPress users can be Administrators, Editors Authors, Contributors, or Subscribers — depending upon the roles and permissions associated with each one.
When you create new users, you can define their roles as well.
Simply click the “Add New” submenu to create a new users and you can set their user roles, password, and email id when you do so.
Here’s a quick glance of user roles:
- Administrators have access to all administration features in the site and can manage other users as well.
- Editors can write and publish their own posts as well as manage those of other users.
- Authors can write and publish their own posts, and are able to upload files as well.
- Contributors can write and manage their posts but cannot publish them or upload files.
- Subscribers can only manage their own profiles in the system.
2. Your WordPress Profile

Your Profile is your personal profile and it contains information about you and your account. When you create new users, you can set their basic information like username, email, name, website, password, and user role.
So if users want to edit their profile information then they can go to their respective “Your Profile” page on their WordPress dashboard and can change the dashboard theme color, password, bio, email, display name, etc. by themselves.
3. Your WordPress Profile (After Customization)

When you visit your own WordPress site while you are logged in, you will see a toolbar at the top of all blog posts and pages. It gives immediate access to your WordPress dashboard and some of its features (Dashboard, Profile, Themes, etc.) and even shows the number of available WordPress Updates and Comments awaiting moderation.
So if you want to hide it then you can do it from “Your Profile”. Simply uncheck the “Show Toolbar when viewing site” option on “Your Profile” settings page.
Additionally, if you are a coder then you might want to disable the visual editor and you can do it from the “Your Profile” page. Just check the “Disable the visual editor when writing” option and you will only see the text view (or HTML view) of posts and pages when writing or editing one.
4. WordPress General Settings
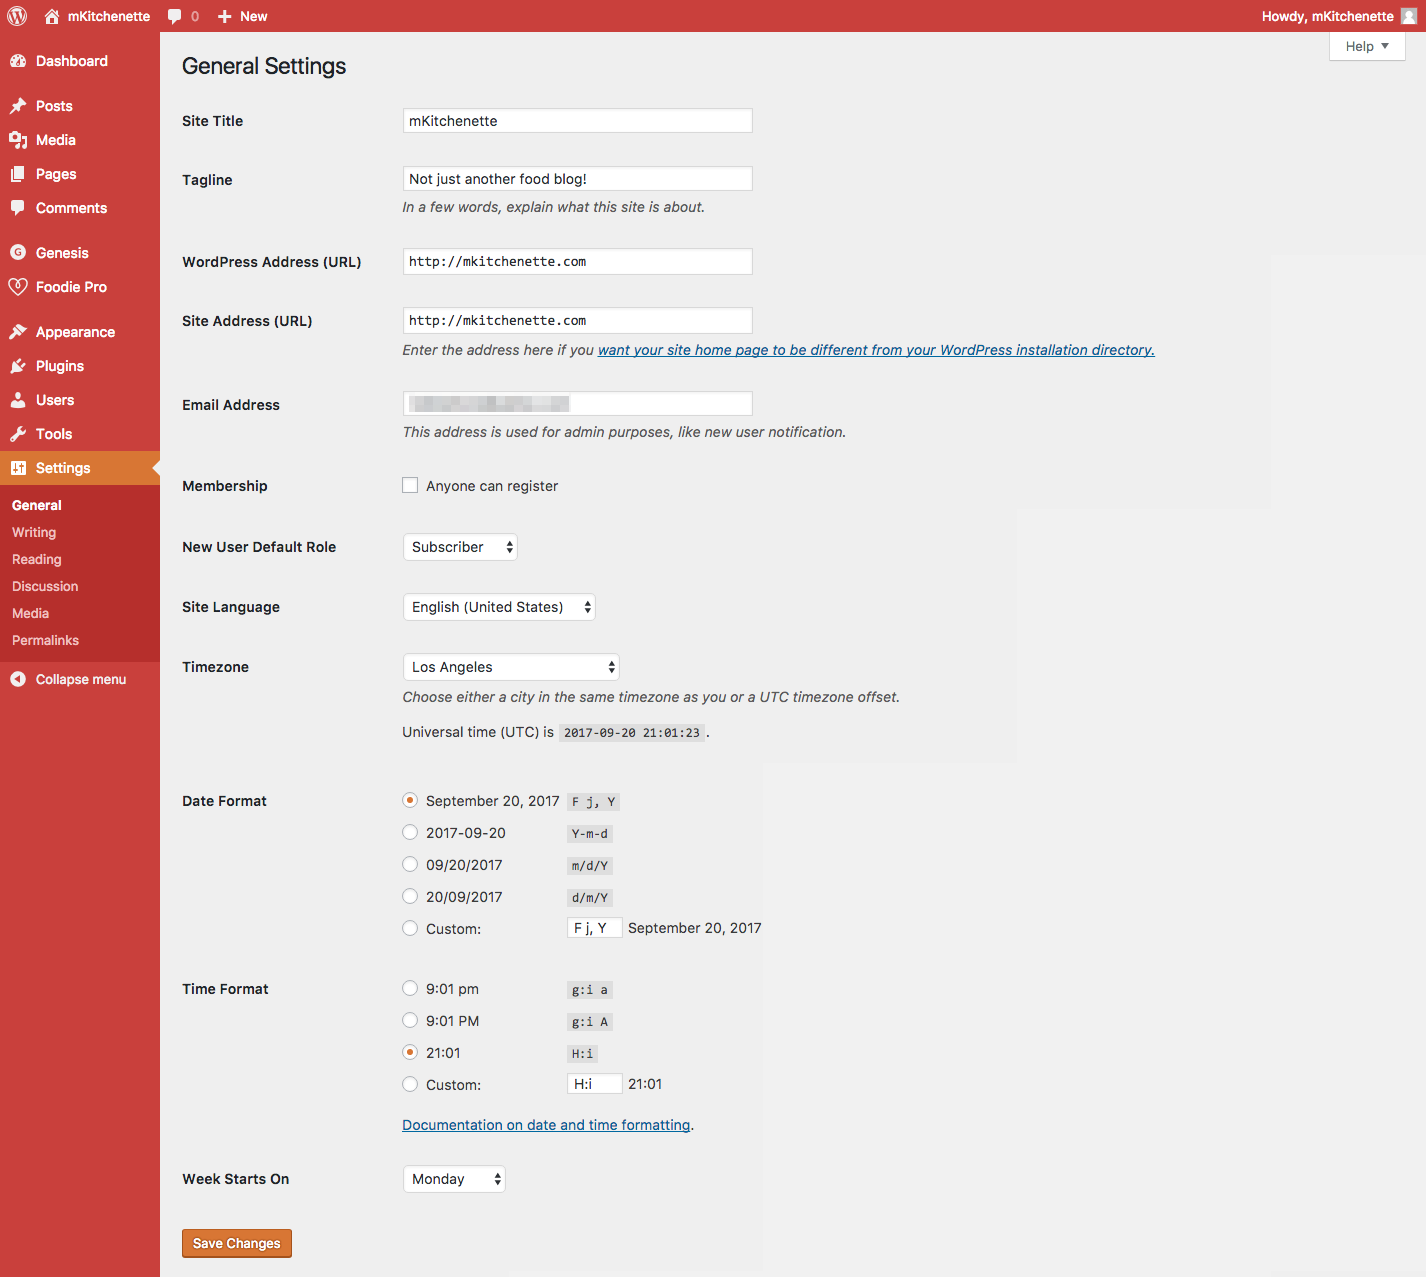
“General Settings” is the default Settings screen and it lets you configure/change your blog title, description, URLs, admin email, time zone, etc. Do not change the “WordPress Address (URL)” or “Site Address (URL)” unless you know its usage and purpose.
5. WordPress Writing Settings

You can publish content either from the WordPress Dashboard (using the WordPress Editor) or can use 3rd-party tools like (Blogo, Open Live Writer, etc.) or even via email. “Writing Settings” lets you change the default post category, post format, and link category.
There’s also a section called “Update Services” where you can add custom site update services so that WordPress will notify them when you publish a new blog post. You do not have to do anything there as WordPress already pre-fills it with an universal update service called Pingomatic (http://rpc.pingomatic.com/).
6. WordPress Reading Settings

“Reading Settings” lets you customize your homepage content and RSS feeds. That is, you can either show all your latest blog posts or a static page (whether it’s your about me, or an archive page, or a custom page) as your frontpage.
Also, you can change the number of blog posts shown per page on your blog and on your RSS feeds. And you can also choose whether to show only an excerpt of each blog post or to show its full content on your RSS feeds.
Finally, if you do not want search engines to index your blog (or show your website on search results) then you can check “Discourage search engines from indexing this site”
7. WordPress Discussion Settings
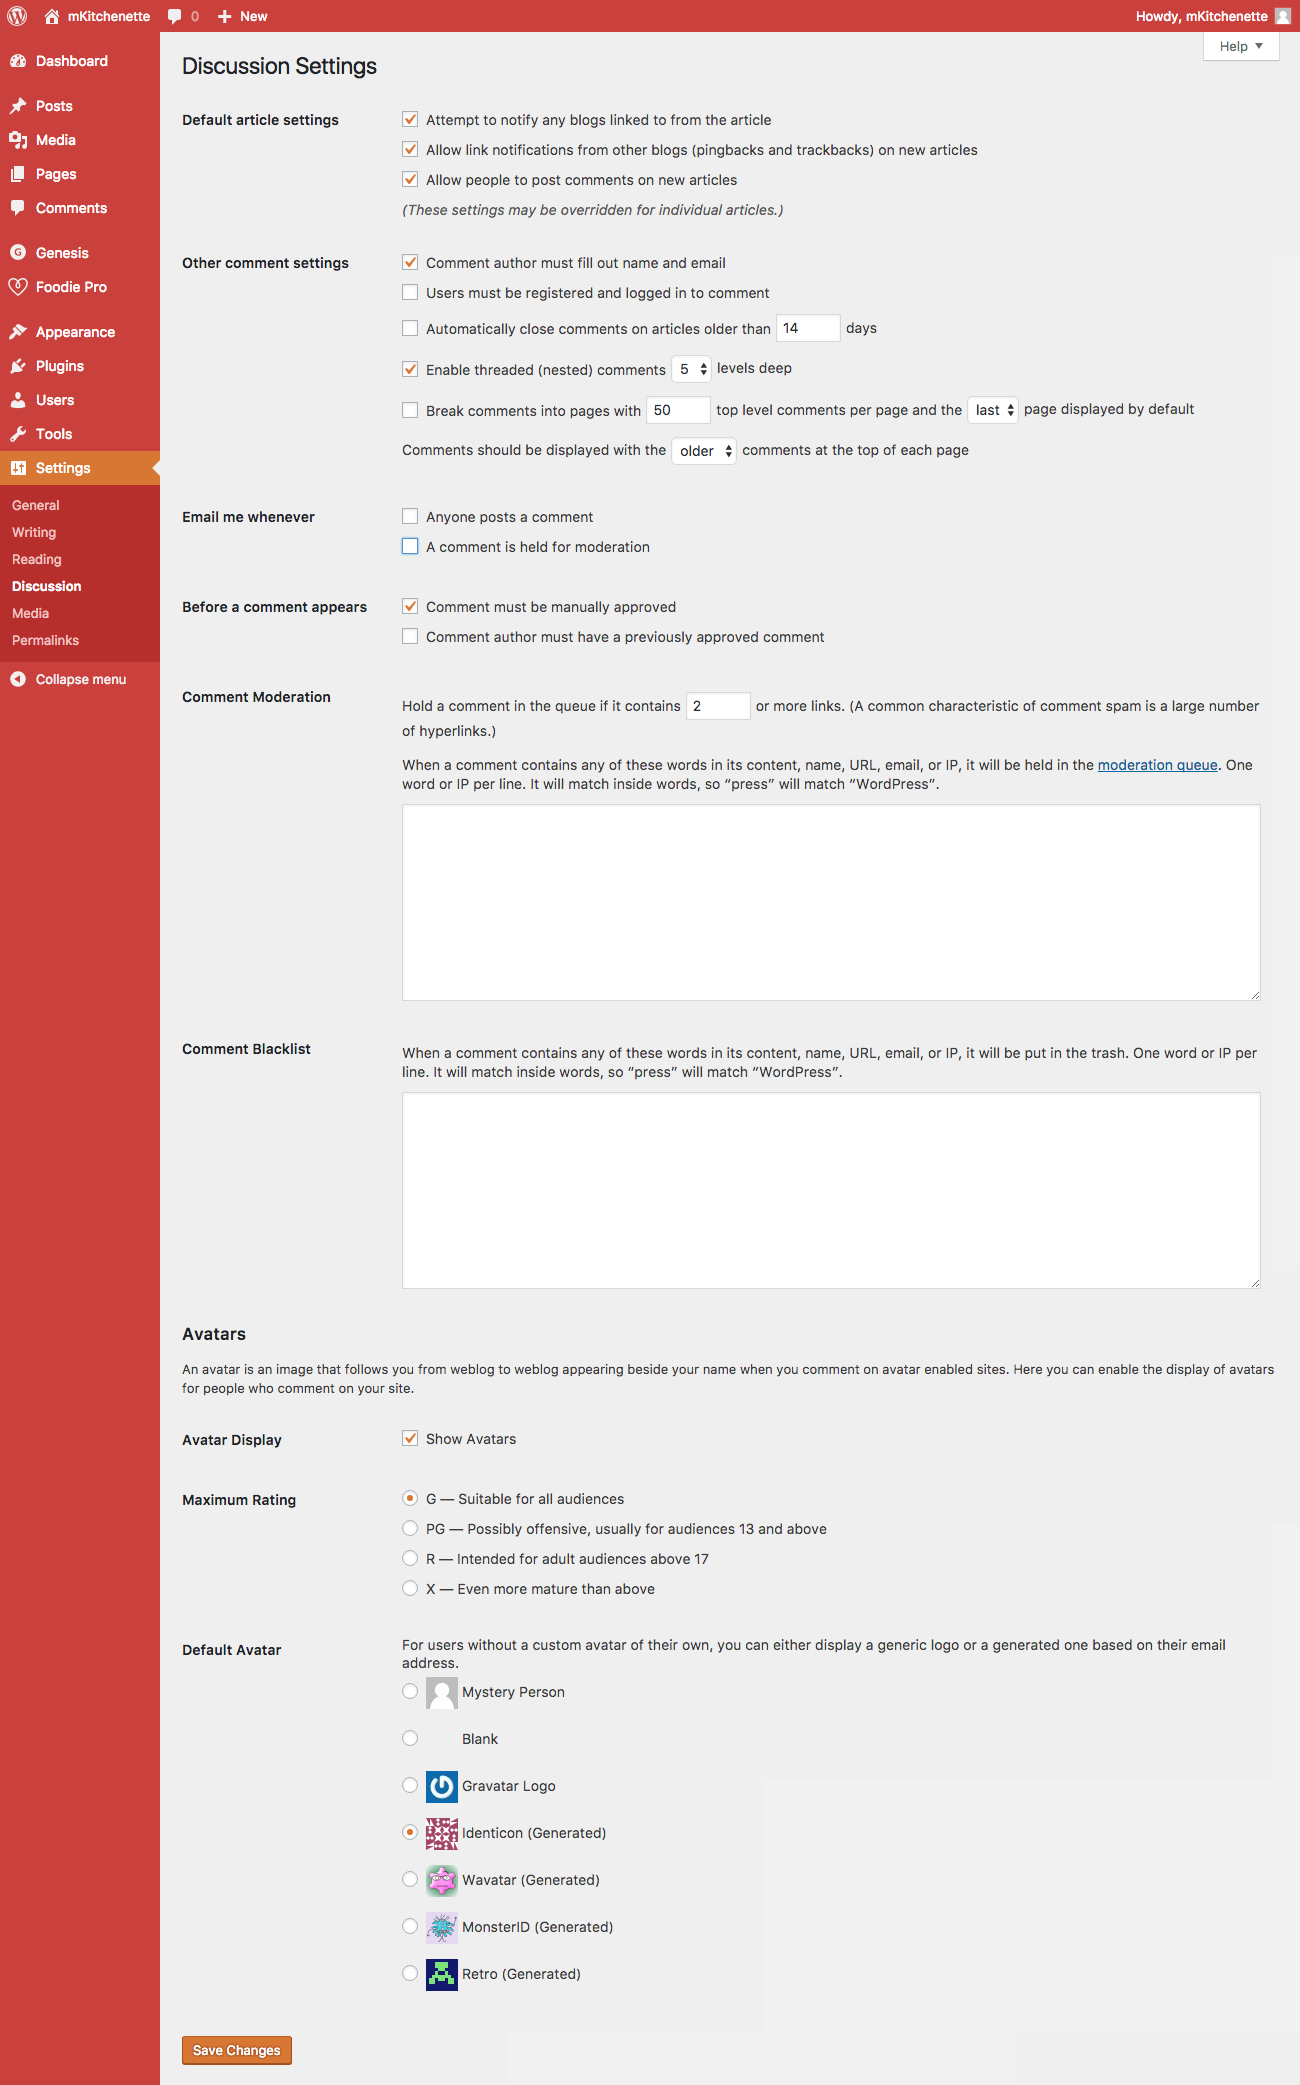
“Discussion Settings” lets you change several options related to the default WordPress comment system. For instance, you can by default turn off comments completely for all blog posts by unchecking “Allow people to post comments on new articles” or can even choose to automatically close comments on blog posts older than X number of days.
Again, you can also control the way comments are approved and organized. That is, you can approve a comment automatically as soon as you get it or can hold it for moderation (I do it).
Finally, there’s another section called “Avatars”.
An avatar is an image that follows you from weblog to weblog appearing beside your name when you comment on avatar enabled sites.
Here you can customize the avatars of people who comment on your blog. If you want to know more about all the available Discussion options, go here.
8. WordPress Media Settings

“Media Settings” lets you change the thumbnail sizes of images that you place in a blog post and usually you don’t have to edit these settings as they’re automatically set by the WordPress theme that you are using.
You can also control how your uploaded files are organized. WordPress by default organizes your uploads by month and year. That is, if you upload a file in August 2017, then WordPress will place it in http://www.example.com/wp-content/uploads/2017/08 folder (by automatically creating the folders: “2017” and “08”).
If you uncheck “Organize my uploads into month- and year-based folders” then all your uploads will be placed in http://www.example.com/wp-content/uploads/ (in an unorganized way).
9. WordPress Permalink Settings
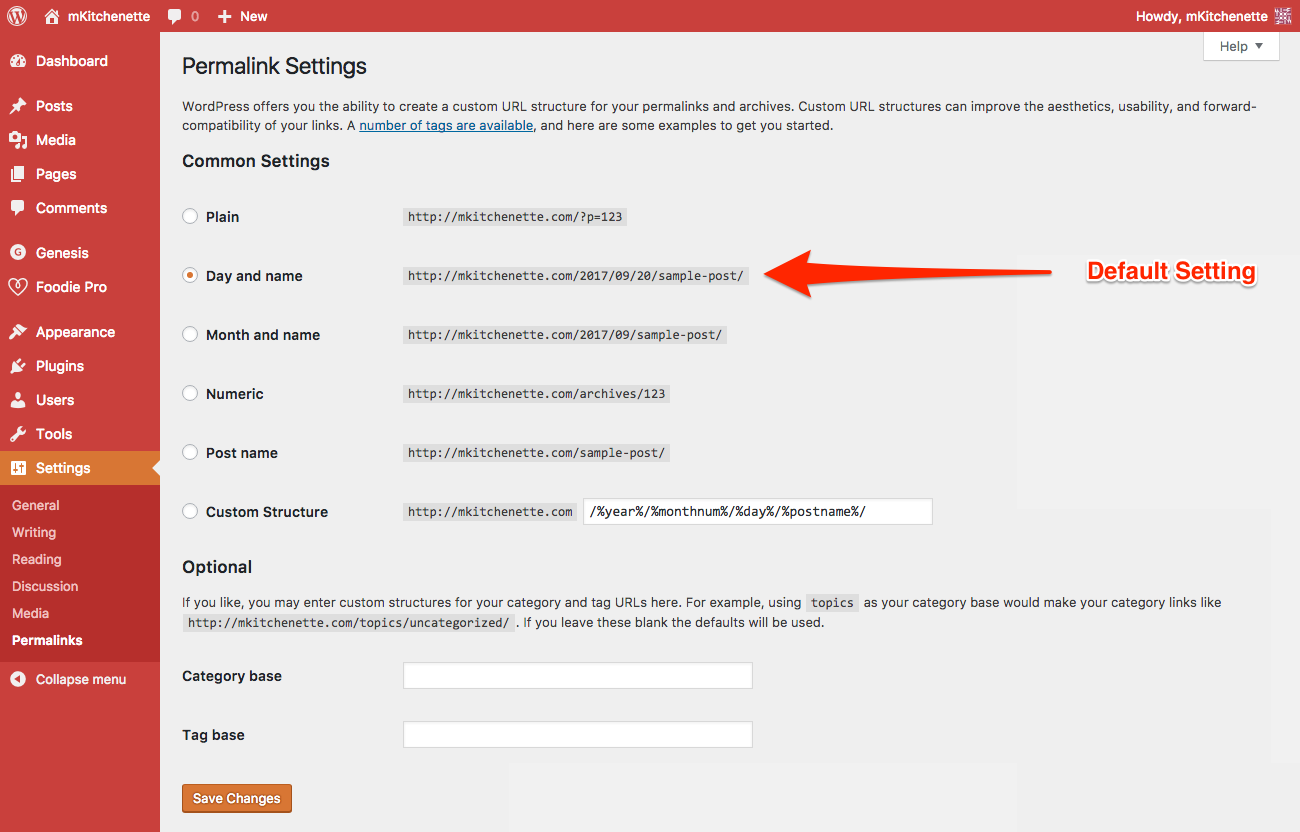
“Permalink Settings” lets you change the format of the permanent URLs of your blog posts and pages. The default permalink format of WordPress is either lengthy or not so user/search friendly.
In fact, WordPress itself officially calls the default permalinks as “Ugly”. And it’s usually of the format http://www.example.com/year/month/day/post-name/ or http://www.example.com/?p=123.
9.1. WordPress Custom URL Structure

WordPress lets you customize the URL structure the way you want by using a custom format like http://www.example.com/post-name/ (if you want to keep it short and search engine friendly) or something like http://www.example.com/archives/post-number/ (if you like numbers). You can go here to learn more about the available permalink formats.
You can also change the URL structure of the categories and tags on your blog. The default permalink format of a category archive page is: http://www.example.com/category/category-name/ and the default permalink format of a tag archive page is: http://www.example.com/tag/tag-name/.
How To Start A Food Blog — Step-by-Step Tutorials
- How To — Start A Food Blog — Buy A Domain Name & Web Hosting
- How To — Start A Food Blog — Install WordPress
- How To — Start A Food Blog — Install A WordPress Theme
- How To — Start A Food Blog — Import WordPress Demo Content And Install & Configure Necessary WordPress Plugins
- How To — Start A Food Blog — Change WordPress Profile & Settings
- How To — Start A Food Blog — Install & Configure Essential WordPress Plugins
- How To — Start A Food Blog — Customize WordPress
- How To — Start A Food Blog — Setup Essential Blogging Tools
- How To Start A Food Blog (A Delicious Handbook)
