
Now that you have purchased a domain name and a web hosting plan, it’s time to get to know your web hosting account and setup WordPress on your server. InMotion Hosting calls their account dashboard “AMP” (or Account Management Panel) and it’s from there that you manage various aspects of your web hosting account (including contact & billing information, account password, support ticket, bill payments, domain names, etc.).
So let’s get started!
1. Log In To Account Management Panel (AMP)

Log in to AMP (Account Management Panel) by using your primary email address and the password that you have set (as part of the account activation).
2. Get To Know The AMP
")
It’s your InMotion Hosting dashboard. You can see a handful of options there but its use depends upon your requirements. Anyway, I have highlighted few options that you need to pay attention.
- Contact Information — To make sure that your contact information is up-to-date.
- Submit Support Ticket — To get support (including technical assistance) related to your web hosting account.
- cPanel — To manage your website (note that its purpose is different from that of AMP). You use the AMP to manage your web hosting account and you use cPanel to manage your website (including email accounts, subdomains, web applications, files, etc.).
- Account Technical Details — Shows various technical aspects of your web hosting account and server.
- Email — To manage your custom email accounts ([email protected]).
- Softaculous — To install dozens of web applications on your server at the click of a button.
3. cPanel

It’s your dashboard to manage various aspects of your server and thereby your website(s). For instance, you need to go to cPanel (and not AMP) to create a subdomain like premium.mkitchenette.com, or to setup email accounts, or to install a blog, or to manage the files on your server, or to take a website backup, to check the disk & bandwidth usage, to manage databases, and so on.
4. Softaculous

Softaculous is a script library that lets you install a variety of commercial as well as open-source web applications on your website. Softaculous scripts are installed directly from the control panel of your website (cPanel in this case) and it automatically creates databases, set permission, and configure various files.
You can click the “Softaculous” icon (from the AMP) to install various scripts like WordPress, Joomla, Drupal, phpBB, etc. You want to install WordPress, right? So, you can either click on the “WordPress” icon from “Softaculous” or you can click the “WordPress” icon from cPanel itself (as WordPress is already listed there as a “TOP APPLICATION”).
5. WordPress Installation

Enter the basic details to set up your WordPress blog.
- If you want to install WordPress on your domain’s root (i.e. example.com or mkitchenette.com), then you need to leave the “In Directory” field blank (as shown above). And if you want to install WordPress on a subfolder named blog (i.e. mkitchenette.com/blog/) then you need to enter “blog” in the directory field.
- Enter the Site Name (or the name of the blog) and Site Description (or the tagline of the blog). Oh yeah, you can change it anytime.
- Enter the Admin Username (or login id), Admin Password (or login password), and Admin Email (to reset the password and for all notifications).
- Enter an email address (can be different from your admin email) for the “Email installation details to” field.
- Click “Install”.
6. Installing WordPress

Shows the progress of your WordPress installation.
7. Installed WordPress
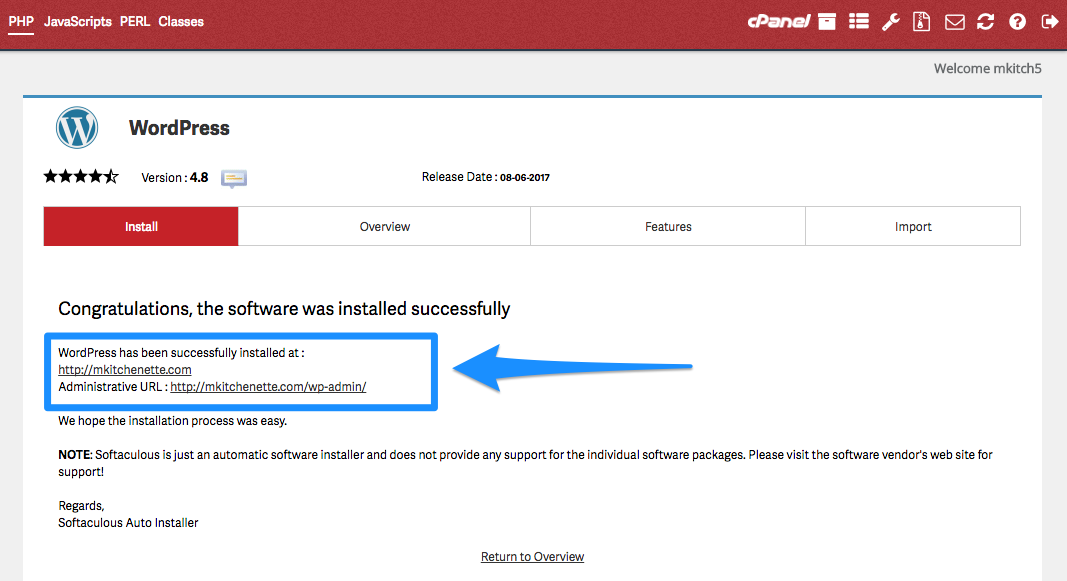
Now that WordPress installation is done on your server. And you can access your WordPress site by clicking on your domain name. You will get the WordPress installation details to your admin email id (provided during installation step).
8. WordPress New Installation Details

Your WordPress installation details email will show your URL (or the WordPress site address), Admin URL (to enter the backend), WordPress Admin ID, and database details.
How To Start A Food Blog — Step-by-Step Tutorials
- How To — Start A Food Blog — Buy A Domain Name & Web Hosting
- How To — Start A Food Blog — Install WordPress
- How To — Start A Food Blog — Install A WordPress Theme
- How To — Start A Food Blog — Import WordPress Demo Content And Install & Configure Necessary WordPress Plugins
- How To — Start A Food Blog — Change WordPress Profile & Settings
- How To — Start A Food Blog — Install & Configure Essential WordPress Plugins
- How To — Start A Food Blog — Customize WordPress
- How To — Start A Food Blog — Setup Essential Blogging Tools
- How To Start A Food Blog (A Delicious Handbook)
